
You configure DLP policy rules to build a precise, automated defense against data loss. It’s the technical core of any data loss prevention strategy, translating your security intent into actionable logic that monitors, detects, and responds to threats.
The goal isn’t just to block everything, but to build intelligent gates that stop leaks while letting legitimate business flow. Done right, it’s a continuous process of tuning and refinement. Keep reading to learn the step-by-step method for creating rules that work effectively from day one.
Key Takeaways
- Define precise conditions using data classification and patterns.
- Configure graduated actions from user warnings to hard blocks.
- Test rules in simulation mode before full enforcement.
The Foundation of Effective DLP Rules
We still think about one of the first serious DLP incidents we dealt with. An employee under deadline pressure sent a spreadsheet with customer data to a personal email account. The system caught it, sure, but the alert was just a bland “policy violation.” No real context, no real guidance.
Everyone looked at the user like they’d done something terrible. But the more we walked through it, the clearer it became: the real problem wasn’t the person, it was the rule. It was vague, clumsy, and way too broad.
That moment changed how we looked at DLP rules. They aren’t brick walls meant to block everything. They’re more like well-placed signs, guardrails, and soft barriers that help people stay on the right path without tripping over the system every five minutes. Setting them up isn’t just a technical task. It’s a craft you tune over time [1].
What Are DLP Policy Rules, Really?
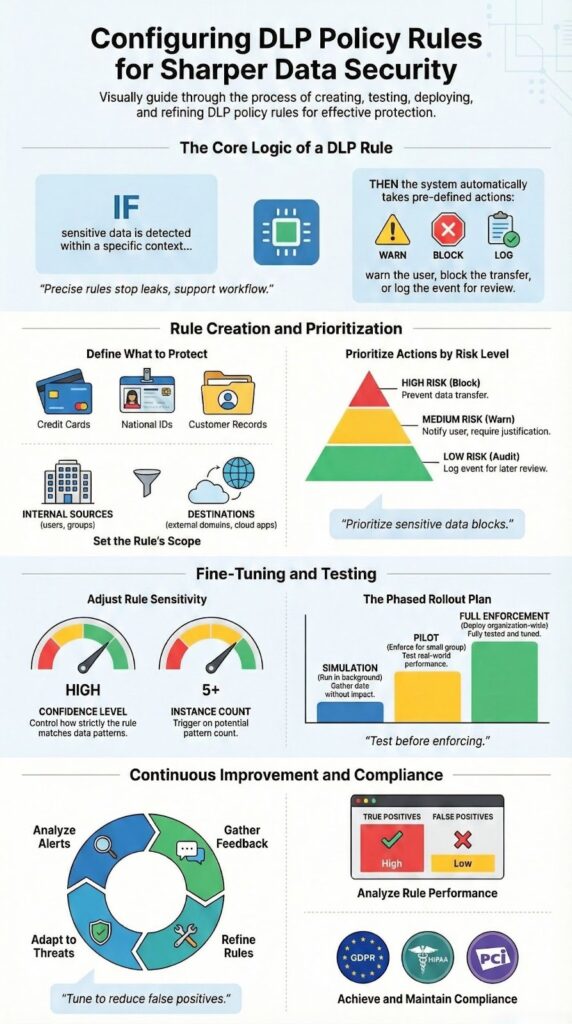
At the most basic level, a DLP policy is just a container. The actual intelligence lives in the rules inside it. Each rule is basically a structured “if-then” sentence:
- IF certain sensitive data is detected
- AND it’s moving from one specific place to another
- THEN trigger one or more actions
That’s the skeleton. The challenge is in the details, where you decide how strict or forgiving each part should be. You want rules that:
- Catch real leaks or misuse
- Ignore harmless, low-risk behavior
- Give users clear, helpful feedback when they cross a line
In a way, DLP rules are like data traffic laws. They don’t exist to punish everyone. They exist to:
- Prevent careless accidents
- Slow down risky behavior
- Stop truly dangerous data from slipping out unnoticed
Building them usually follows a steady, almost boring pattern in the admin console, but that’s where the nuance comes in. You typically move through steps like:
- Define the sensitive data
- Credit card numbers
- IDs
- Customer records
- Internal-only documents
- Define the context
- Where is the data stored? (email, cloud storage, endpoints)
- Who’s sending or accessing it? (departments, roles, external users)
- How is it moving? (sharing, downloading, copying, printing)
- Define the response
- Just log the event
- Warn the user with a clear explanation
- Require justification or approval
- Block the action outright
Most platforms, Microsoft Purview, Google, and niche DLP vendors, walk you through this same logical flow: what to look for, where to look, and what to do when you find it.
The gap between “good enough” rules and truly effective ones usually comes down to:
- How narrowly you define sensitive content (using patterns, classifiers, context)
- How well you match actions to risk level (warn vs. block vs. escalate)
- How much you respect actual work patterns, instead of fighting them
That’s where DLP stops feeling like a blunt instrument and starts working like a quiet, reliable safety net.
Step 1: Accessing the Policy Management Console

The first real move happens in what feels a bit like mission control. Every system has one. In Microsoft Purview, you go to the Compliance Center, then into the Data Loss Prevention area. In Forcepoint Security Manager, you head to DATA > Policy Management.
This console is where every DLP policy lives and breathes. You see it all from here: what exists, what’s active, what’s noisy, what’s broken. Effective MSSP security fundamentals help guide how you select tools and manage these consoles, ensuring monitoring covers all critical vectors without overwhelming your team.
The first time you land on this page, it can feel crowded, buttons, tabs, filters, alerts. The trick is to block out everything that isn’t tied to your goal. For this step, that goal is simple:
- Create a new policy, or
- Pick an existing one that needs better rules
That’s it. Everything else can wait.
Working with Policies and Templates
Most platforms greet you with a set of default or prebuilt policies. They usually map to well-known requirements, like:
- GDPR
- HIPAA
- PCI
- Internal “confidential data” templates
These are useful as training wheels. They show:
- How the vendor thinks about risk
- What they consider “sensitive” by default
- Which actions they think should fire for certain data types
But if you want real control, you eventually outgrow the templates. That’s when you start building your own policy.
You’ll usually see a clear button, something like:
- Create policy
- New DLP policy
Clicking that kicks off a wizard. It’s structured on purpose, step by step, so you don’t:
- Skip a needed scope
- Forget to define locations
- Leave a policy active with no rules that actually matter
In this stage, you’re not micromanaging rules yet. You’re doing something broader: setting the intent of the policy. That includes decisions like:
- Is this policy for a specific regulation or a business need?
- Is it meant to monitor quietly or enforce hard blocks?
- Which parts of the environment does it care about? (email, cloud, endpoints, web)
Once that high-level frame is in place, then you move on to the more precise work, crafting the individual rules that decide what gets flagged, what gets blocked, and what gets a friendly warning instead.
Step 2: Creating or Editing a DLP Policy

Naming your policy seems trivial, but it’s critical for long-term management. “Policy_01” tells you nothing in six months. A name like “Block External Sharing of Financial Data” is instantly clear. The description field is your chance to add context. Note the business reason, the stakeholders involved, and any special considerations. This documentation is invaluable when someone else needs to troubleshoot or modify the policy later.
You then select the locations this policy will cover. Will it monitor Exchange Online for emails? SharePoint and OneDrive for files? Teams for chat messages? Or endpoints for USB transfers? This is your first scoping decision. A common best practice is to start with a single location, like SharePoint, for your initial testing. Casting too wide a net too early can generate an unmanageable flood of alerts, making it harder to identify the real signals.
- Policy Name: Be specific and descriptive.
- Policy Description: Include business justification and scope.
- Locations: Start with a single, critical location for pilot testing.
Step 3: Defining the Rule’s General Settings
This is where you stop thinking in broad strokes and start shaping actual behavior. Inside a single policy, you can have several rules, each with a different job, and they’re processed in a specific order. That order is not just a detail, it’s the backbone of how the policy behaves.
You usually start by selecting the policy, then choosing something like Add rule or New rule. That single click is where the logic chain for that rule begins.
A helpful way to keep this clean is to treat each rule like a sentence you can read out loud. For example:
- Rule name: Detect >5 Credit Card Numbers in Email to External Domains – Block
From that name alone, anyone reviewing an incident should be able to guess:
- What data is being detected
- Where it’s being detected
- What threshold matters
- What the system is supposed to do
Clear names save time when you’re scanning logs at 11 p.m. trying to understand why something was blocked or allowed.
Priorities, Order, and Why They Matter
Most platforms have some way to set:
- Priority level, or
- Rule order (top to bottom, 1, 2, 3, etc.)
This is more than cosmetic. The system typically evaluates rules in order, and once certain conditions are met, especially with strong actions like Block, the later rules might never get a chance to run.
A simple way to think about rule order:
- Put your most sensitive protections first
- Example: “Top-Secret Designs – Block Any External Sharing”
- Follow with medium-risk controls
- Example: “Customer PII – Warn on External Email, Allow With Justification”
- Then add broad, low-friction rules
- Example: “Monitor General PII – Audit Only”
If you flip that order by mistake, you can end up with:
- A mild “audit only” rule triggering first
- The serious “block top-secret data” rule never firing
- Data that should have been stopped sliding through because the wrong rule got evaluated first
It’s basically a logic chain. The system walks through the rules one by one, and the sequence you define becomes the story your DLP tells:
- What it cares about most
- What it lets slide with a warning
- What it only watches quietly in the background
Getting the general settings right, especially naming and priority, makes every later step easier: tuning incidents, explaining behavior to stakeholders, and adjusting rules without breaking the policy’s overall intent.
Step 4: Setting the Condition: Identifying Sensitive Data
The rules start to feel real once you tell them what “sensitive” actually means. This part, the condition, is where the system decides what to watch for and when to care. It’s less about buttons and more about definitions.
Most modern DLP platforms come with a built-in catalog, usually called Sensitive Information Types (SITs). These are ready-made patterns for:
- Credit card numbers
- Social Security numbers
- Passport numbers
- Bank account details
- National IDs and tax IDs
You can treat these like building blocks. One rule might watch for a single type, while another uses combinations, for example:
- Trigger when a file contains:
- A credit card number AND
- A Social Security number
That kind of pairing raises the confidence that you’re looking at truly sensitive data, not just a stray pattern that happens to look like one.
Custom Conditions: Keywords and Regex
Templates are helpful, but real environments are messy. Sooner or later, you need to handle data that’s unique to your organization.
That’s where custom conditions come in. Typical tools let you work with:
- Keyword lists
- Product codenames
- Internal project names
- Phrases like “Internal Only” or “Do Not Distribute”
- Regular expressions (regex)
- Proprietary ID formats (like PRJ-2025-####)
- Custom account numbers
- Local formats that don’t fit standard SITs
Regex is powerful, almost too powerful. With a single pattern, you can cover thousands of possible values. But if you write it loosely, it can start matching ordinary text, random numbers, or even dates that just look similar to your pattern.
A few grounded practices help here:
- Test your regex against real sample data
- Check what it should not match just as carefully
- Start in audit-only mode before you turn on blocking
The aim at this step is simple but strict: define sensitive data in a way that the system can detect accurately, without dragging normal work into every alert.
The Nuance of Confidence and Volume
Once you’ve picked the data patterns, you still have two big dials left: how sure the system should be, and how much it needs to see before reacting.
Many platforms expose this as:
- Confidence level (low, medium, high or percentages like 65%, 85%)
- Instance count (how many matches must appear before the rule fires)
Some examples of how you might use those:
- Only trigger if:
- The system is at least 85% confident it’s seeing a valid SSN
- There are 10 or more credit card numbers in one document
- A high-confidence match appears multiple times in an email thread
This is where you filter out noise:
- One credit card number in a long email might be a copy-paste slip, or even test data
- A document with 50 credit card numbers is almost never casual, it’s a real risk
- A single low-confidence SSN match in a log file might be nothing, but five high-confidence matches in a CSV is a red flag
Tuning confidence and volume:
- Reduces false positives
- Keeps users from feeling policed for every minor event
- Lets you reserve the strongest actions (like blocking) for the clearest, highest-risk situations
That level of granularity is usually what separates a basic, noisy DLP setup from a mature one that people actually trust and rely on.
| Sensitive Data Type | Detection Method | Example Use Case | Risk Level |
| Credit Card Data | Built-in SIT (Pattern + Luhn check) | Financial reports shared via email | High |
| Personal Identifiable Information (PII) | SIT + Confidence Threshold | Customer export files | High |
| Internal Project Codes | Custom Regex | Engineering design documents | Medium |
| Confidential Keywords | Keyword Lists | Internal strategy presentations | Medium |
| Source Code Snippets | Fingerprinting / EDM | Developer repositories | Very High |
Step 5: Configuring Actions: What Happens When Data is Matched?
The action is the muscle. It’s what the rule does. Actions typically follow a graduated scale of severity. The most common options include:
- Audit only: Logs the event but takes no action. Perfect for testing.
- Show policy tips: Notifies the user they’re about to violate policy, allowing them to self-correct.
- Block with override: Prevents the action but lets the user provide a business justification and proceed.
- Block: Hard stop. The action is prevented entirely.
Your choice depends on the data’s sensitivity and your company culture. Leveraging preventing sensitive data exfiltration strategies at this stage strengthens your defense, especially when automated response actions intercept threats before harm occurs.
Your choice depends on the data’s sensitivity and your company culture. For low-risk data, a policy tip might be sufficient education. For high-risk data like source code, a hard block is appropriate. You can also configure notifications to alert a security team or the user’s manager. The action plan is where your policy moves from observation to enforcement, so choose actions that match the risk you’ve identified in your conditions.
| Risk Level | Recommended Action | User Experience | Typical Scenario |
| Low | Audit Only | No interruption | Monitoring new rules |
| Medium | Policy Tip (User Warning) | Informational pop-up | Accidental sharing |
| Medium–High | Block with Override | Justification required | Business exception cases |
| High | Block | Action fully prevented | External sharing of PII |
| Critical | Block + Security Alert | Immediate SOC notification | Source code exfiltration |
Step 6 & 7: Defining Scope with Sources and Destinations
A rule that triggers everywhere is a useless rule. Source and destination settings provide critical context. The source is where the data is coming from, a specific department’s SharePoint site, a group of high-risk users, or all company-owned endpoints. You can include or exclude specific sources to fine-tune the rule’s scope.
The destination is where the data is going. This is often the most important filter. Detecting a credit card number is one thing; detecting it just before it’s emailed to a personal Gmail account is the real threat. You can set destinations as internal (safe), external (risky), or specific cloud applications like Dropbox or Google Drive. By combining a sensitive data condition with a risky destination, you create a highly targeted and effective rule. This context is what makes a rule smart.
- Common Source Filters: Specific user groups, IP address ranges, named locations.
- Common Destination Filters: External domains, unapproved cloud apps, USB removable storage.
Step 8: Testing and Refining the Rule
This is the phase people rush past, then regret later. A new DLP rule might look perfect on paper, but until you see how it behaves with real traffic, it’s just a theory.
You should never flip a brand-new rule straight into full enforcement. Most major DLP platforms give you some kind of simulation, test, or audit-only mode. In that state, the rule:
- Evaluates data as if it were live
- Generates logs and incidents
- Does not actually block or modify user actions
You let it run like this for a bit, usually a few days to a week, depending on how much activity you see in your environment.
Watching the Results: What to Look For
While the rule is in test mode, the reporting tools become your best source of truth. You’ll typically use:
- Activity explorer / incident viewer
- Reporting dashboard or analytics views
You’re not just checking if the rule “works.” You’re asking:
- Are there many false positives?
- Normal business emails being tagged as violations
- Internal file shares being flagged for minor or harmless content
- Is it missing obvious violations?
- Known test files with sensitive data going unflagged
- Real incidents that slip through without any alert
If either side is off, too noisy or too quiet, you adjust.
Some of the most common tuning moves:
- Change the confidence level
- Raise it if you’re catching too many borderline matches
- Lower it if real violations aren’t being picked up
- Adjust the instance count
- Increase the threshold (for example, from 1 to 5 or 10 matches) to cut down noise
- Decrease it if someone can leak high-risk data in just one or two entries
- Refine your custom keywords or regex
- Remove or narrow overly broad terms
- Add context terms that make matches more precise
The real aim here isn’t perfection; it’s balance. You want a rule that:
- Consistently catches genuine threats
- Stays quiet during normal, healthy work
- Doesn’t train users to ignore alerts because “it always complains”
Testing and refining turns a rule from a blunt instrument into a tuned control. It’s less about a single change and more about a feedback loop: observe, adjust, test again, until the rule behaves like a helpful guardrail instead of a roadblock.
Step 9: Deploying the Rule and Ongoing Management
Credits : Andy Malone MVP
There’s a quiet moment when you decide the rule is ready to leave the safety of test mode. Up to this point, it’s been watching, logging, pretending to enforce. Now it actually will.
Most platforms make this shift simple on the surface: you change the status from Test, Audit-only, or Simulation to On, Active, or Enforce. That one switch flips the rule from observer to actor.
Even so, deployment shouldn’t be all-or-nothing. Many organizations find benefits outsourced data loss prevention bring cost efficiency and expertise that internal teams often can’t match, especially during complex rollout phases.
A more controlled rollout usually looks like this:
- Turn the rule on for a small pilot group first
- A specific department
- A group of power users
- A mix of roles that often handle sensitive data
- Watch how it behaves in their real, daily work
- Fix any obvious friction before expanding the scope
This way, the first real test in production doesn’t hit the whole company at once.
Treating DLP as Ongoing Work, Not a One-Time Project
Once the rule is enforcing, the work shifts from design to maintenance. The rule is now part of how your organization moves data, and that means it has to adapt alongside that data.
You’ll want a regular rhythm of review, using:
- DLP alerts and incidents
- Override logs (when users justify or bypass a block)
- Trend reports over weeks or months
Some signals to watch for:
- Frequent user overrides
- If people keep justifying their way past a block, that’s a clue
- It might mean the rule is cutting across a legitimate, important business process
- In that case, you may need:
- A scoped exception
- A different action (warn instead of hard block)
- A refined condition so it’s more targeted
- New data types showing up
- New product lines
- New customer identifiers
- New regulations or contracts with data clauses
- These often call for:
- New rules
- Updated keyword lists
- Fresh custom classifiers or regex
- Silent gaps
- If reports are always empty, that doesn’t always mean “no risk”
- It might mean the rules are too narrow or outdated
DLP works best when it’s treated like a living system, not a static control. Data changes. Tools change. People find new ways to work around friction.
A practical habit is to schedule regular reviews, for example, quarterly, to:
- Retire rules that no longer make sense
- Tighten rules that are too loose
- Loosen rules that cause unnecessary disruption
- Align new policies with new projects or regulations
Over time, the goal is a rule set that feels almost invisible to users most days, but very present in the rare moments when it needs to step in and stop data from going somewhere it should never go [2].
FAQ
How do you start DLP policy configuration with clear data loss prevention rules?
Start DLP policy configuration by defining data loss prevention rules around sensitive data detection. Use data classification, policy templates, and content inspection rules. Add keyword matching, regex patterns, PII detection, credit card rules, and SSN patterns. Set rule conditions, severity levels, and incident actions. Enable audit logging. Use simulation mode and test policies before policy deployment.
How do content inspection rules reduce data leaks across email, web, and cloud?
Content inspection rules scan data using file scanning, exact data match, indexed document match, and fingerprinting. Network DLP, endpoint DLP, and cloud DLP cover email protection, web filtering, and SaaS app monitoring. Exchange rules, Outlook add-ins, SharePoint protection, OneDrive scanning, and Teams compliance help block transmission or quarantine files early.
How do you tune policies to reduce false positives and user disruption?
Use false positive reduction through policy tuning and context analysis. Adjust rule priority, nested policies, exception rules, and user overrides. Apply scope locations, source filters, and destination controls. Use activity explorer, policy analytics, and compliance reports to review alerts. Test changes in simulation mode. Update rule conditions based on real incidents.
How do DLP rules support compliance like GDPR rules and HIPAA policies?
Use GDPR rules and HIPAA policies with health data compliance settings. Apply encryption enforcement, watermarking, and incident response workflow steps. Configure remediation actions, risk scoring, and adaptive protection. Support insider threat detection and exfiltration prevention. Use compliance reports for audits. Align zero trust DLP with role-based access and group policies.
How do advanced tools improve DLP coverage across devices and platforms?
Advanced tools use machine learning DLP and custom classifiers for better sensitive data detection. Control USB control, printer monitoring, clipboard protection, and screenshot blocking. Add browser extensions DLP, mobile device management, and BYOD policies. Monitor SaaS apps. Use Microsoft Purview DLP, Google Workspace DLP, and other policy management console tools without bias.
Your Path to Confident DLP Rule Configuration
Configuring DLP policy rules requires focus and discipline. You should start with the most sensitive data. Test each rule in controlled phases. Refine based on real findings. This approach reduces false positives and keeps business workflows running. Teams that invest time in tuning usually achieve stronger and measurable data protection.
If you are an MSSP and want faster results without trial and error, expert support makes a difference. We help streamline operations, reduce tool sprawl, and improve service quality. With over 15 years of experience and 48,000 projects completed, we deliver clear and practical guidance. Our services cover needs analysis, vendor shortlisting, PoC support, and stack optimization.
Join the discussion and explore how we can support your growth here.
References
- https://www.mecs-press.org/ijeme/ijeme-v15-n2/v15n2-1.html
- https://iuojs.intimal.edu.my/index.php/joit/article/view/523